I have been using React for more than 2 years. In this time it became one of the most popular Javascript libraries out there. And for good reasons. It is fast, easy to use and it just makes sense.
It is used for building user interfaces. And that is its only and primary purpose. So unlike some other libraries out there, like Angular or Backbone, it is not a full blown framework. It doesn’t give you all the tools you need for a modern web app. You use it to build UI components. For everything else like services, ajax calls or building tools you will have to use extra libraries.
What first attracted me to it was a modular component approach to building UI. So every part of UI is build using small components that are in turn build by even smaller components. Its very similar how you would build a LEGO structure. And each of those components is reusable and independent of other components. That makes it quite easy to change a part of your UI, or add new components, without breaking the whole app. And also makes the whole thing quite easy to test.
Overview
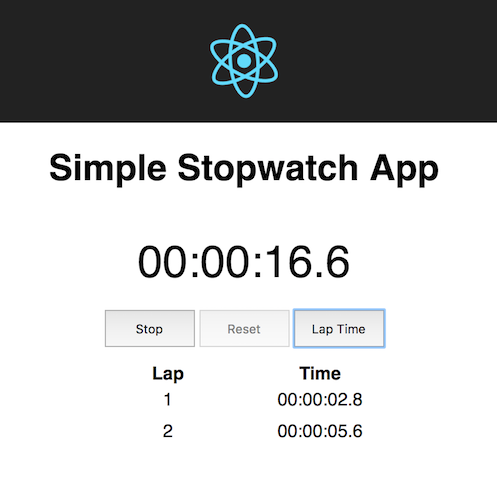
So today we will be building a stopwatch app using React. It will be quite simple with only a timer, few control buttons and a list to store lap times.

So a full list of features is:
- A stopwatch timer showing the elapsed time in the format hh:mm:ss.S `hours:minutes:seconds.miliseconds.
Startbutton that starts the stopwatch andStopbutton that stops it.Startbutton should be hidden while the stopwatch is running, likewiseStopshould be hidden while it is stopped.- Reset button that resets the stopwatch and clears the lap time list. It is disabled while the stopwatch is running.
- Lap button that when pressed, records the current time in the lap time list. It is enabled only while the stopwatch is running.
- The lap time list containing all the lap times saved while the stopwatch was running.
Since this tutorial is aimed at React beginners I will not be doing unit test in it. They will be done in a separate post, probably after this one. Reason for it is to keep it short and focus only on React and not testing tools.
The code from the tutorial is hosted on Github and you can find it here.
Requirements
This is a beginner React tutorial. But it requires intermediate JavaScript knowledge. Especially the new ES6 syntax.
Also to do anything in modern Javascript development you will need to install Node and NPM. There are install instructions on their websites and hopefully you can find them. The instructions are different based on the system you are using.
We will also use Create React App that will scaffold our app for us. Meaning it will generate some starter files to save us time.
To install it globally, so it can be used from any location, run:
$ npm install -g create-react-app
It also abstracts a lot of the build process. That makes it easier to concentrate on building our app instead worrying about all the build tools.
That said, once you want to build something more complex, you will have to understand your build process. Tools like Babel and Webpack are a must for any modern front end developer.
Good thing about Create React App is that it does give you control over those things if you ask for it nicely. If you run npm run eject, you will reveal all the configuration files, build scripts and dev dependencies. But I don’t recommend doing it now since it is not in scope of this tutorial.
Lets Start
We will use the Create React App installed above to create a new app called react-stopwatch-app. First navigate to your favorite projects location and run:
$ create-react-app react-stopwatch-app
It will create few files and folders for us. In public folder there is an index.html file which is a template for our app. And in src folder there are index.js which is used to inject our app into the template, and App.js which is our main component.
There are also CSS files for both of those. That is because in React everything is modular. That includes the CSS. So each component comes with its separate CSS file which is than imported and used only in that component. Global CSS that affects many things should go to index.css.
Modular approach
We will create our stopwatch as a separate module that will be imported into our app. To do this we create a separate stopwatch folder inside of our src folder. And inside of it we create 3 more folders components, constants and utils. We also create a index.js file that will serve as an entry point for out module.
That is done like this so that inner workings of the module are hidden from the outside. And only things exported in ìndex.js are available from the outside.
Constants
Constants are used to store some constant values or configuration files. We will have one config file so we create it and name it Config.js.
We only have one option and that is updateInterval. It determines how often is our our timer updated. So our Config.js file looks like:
// src/stopwatch/constants/Config.js

export default {
  updateInterval : 100 // Our timer will be updated every 100 miliseconds
}
Utils
Utils are used for helper functions. In our case we will have one helper function to format our time. Since time is stored in milliseconds we format it to hh:mm:ss.S to make it more readable to the user.
So we create our timeFormat.js file that looks like:
// src/stopwatch/utils/timeFormat.js

// Add zero padding
function zeroPad(number, size = 2) {
  let s = String(number);
  while (s.length < size) { s = '0' + s;}
  return s;
}

// Convert time from miliseconds int to hh:mm:ss.S string
export default function timeFormat(miliseconds) {

  let remaining = miliseconds / 1000;

  const hh = parseInt( remaining / 3600, 10 );

  remaining %= 3600;

  const mm = parseInt( remaining / 60, 10 );
  const ss = parseInt( remaining % 60, 10 );
  const S  = parseInt( (miliseconds % 1000) / 100, 10 );

  return `${ zeroPad( hh ) }:${ zeroPad( mm ) }:${ zeroPad( ss ) }.${ S }`;
}
Components
Components are the building blocks of any React app. Conceptually, they are like JavaScript functions. They accept arbitrary inputs (called “props”) and return React elements describing what should appear on the screen. They can also contain some inner state and call lifecycle functions.
Component structure is usually described with JSX. That makes it look like HTML template and you have a better sense how it will look like when it is rendered. But JSX is not a requirement for using React. Using React without JSX is especially convenient when you don’t want to set up compilation in your build environment.
Each JSX element is just syntactic sugar for calling React.createElement(component, props, ...children). So, anything you can do with JSX can also be done with just plain JavaScript.
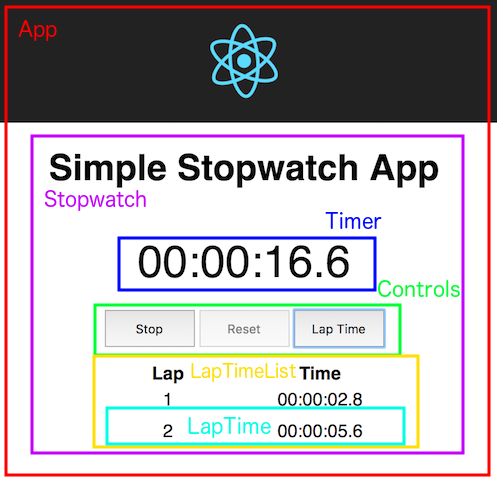
To start we need to create some components. Stopwatch will be our top component and placed directly into the the App. It will also hold the state of our app. Than we will need Timer, Controls, LapTime, LapTimeList.

For each of those we create both .jsand .css file.
What some may find weird is that we will import CSS files into our components. That is possible because of our build tools and it enables more encapsulation of our components. Since each css file only used with one component.
And to use it you just import the file and use classes from it on your components.
If you want to know more about it search for info about Webpack and css-loader.
One other important thing about the components are the ProptTypes. They bring simple type checking into your components that helps a lot during development. We will define all the prop types using the static proptTypes = {} notation at the top of our components. That makes it instantly clear what props are used by the components and what are their types. You can also mark which props are required using the .isRequired after the type.
For example:
  static proptTypes = {
    time      : PropTypes.number,
    isRunning : PropTypes.bool.isRequired,
    onHide    : PropTypes.func
  };
We can also define default values for some by using the static defaultProps = {}. And the best place for that is right after the defining the prop type.
So lets start building our components. We will start with the less complex ones moving on to more complex.
Timer
First we start with the timer. It is a simple component that takes one prop in form of time passed. And than converts that time from a number to a formated string with our timeFormat function. It looks like this:
// src/stopwatch/components/Timer.js

import React, { PropTypes, Component } from 'react';
import './Timer.css';

import timeFormat from '../utils/timeFormat';

class Timer extends Component {

  static proptTypes = {
    time : PropTypes.number
  };

  static defaultProps = {
    time : 0
  };

  render() {
    const { time } = this.props;

    return (
      <div className="Timer">
        { timeFormat( time ) }
      </div>
    );
  }
}

export default Timer;
// src/stopwatch/components/Timer.css

.Timer {
  text-align: center;
  font-size: 40px;
  padding: 20px;
}
Controls
Controls contains all the controls for the app. It takes 5 props. One of it is an isRunning boolean flag that tells the component if the stopwatch is running.
If the isRunning is true:
- Start button is hidden
- Stop button is visible
- Reset button is disabled
- Lap Time button is enabled
If it is false than all of them are reversed.
Other are function handles. We apply function handles to onClick even handlers of our buttons.
// src/stopwatch/components/Controls.js

import React, { Component, PropTypes } from 'react';
import './Controls.css';

class Controls extends Component {

  static proptTypes = {
    isRunning  : PropTypes.bool,
    start      : PropTypes.func.isRequired,
    stop       : PropTypes.func.isRequired,
    reset      : PropTypes.func.isRequired,
    addLapTime : PropTypes.func.isRequired
  };

  static defaultProps = {
    isRunning : false
  };

  render() {
    const { isRunning, start, stop, reset, addLapTime } = this.props;

    return (
      <div className="Controls">
        { !isRunning ?
            <button
              onClick={ start }
              className="Controls__button"
              ref="startBtn" > Start </button>
          : null }

        { isRunning ?
          <button
            onClick={ stop }
            className="Controls__button"
            ref="stopBtn" > Stop </button>
        : null }

        <button
          onClick={ reset }
          disabled={ isRunning }
          className="Controls__button"
          ref="resetBtn" > Reset </button>

        <button
          onClick={ addLapTime }
          disabled={ !isRunning }
          className="Controls__button"
          ref="lapBtn" > Lap Time </button>
      </div>
    );
  }
}

export default Controls;
// src/stopwatch/components/Controls.css

.Controls {
  text-align: center;
}

.Controls__button {
  padding: 10px;
  width: 80px;
  cursor: pointer;
  margin: 0px 2px;
}
LapTime
This is a simple component that shows the current lap and formated time in one row. It is used within LapTimeList. And takes lap and time numbers as props.
// src/stopwatch/components/LapTime.js

import React, { Component, PropTypes } from 'react';
import './LapTime.css';

import timeFormat from '../utils/timeFormat';

class LapTime extends Component {

  static proptTypes = {
    lap  : PropTypes.number,
    time : PropTypes.number
  };

  static defaultProps = {
    lap  : 0,
    time : 0
  };

  render() {

    const { lap, time } = this.props;

    return (
      <div className="LapTime">
        <span className="LapTime__lap" >{ lap }</span>
        <span className="LapTime__time" >{ timeFormat( time ) }</span>
      </div>
    );
  }
}

export default LapTime;
// src/stopwatch/components/LapTime.css

.LapTime {
  text-align: center;
}

.LapTime__lap, .LapTime__time {
  width: 50%;
  padding: 5px;
  text-align: center;
  display: inline-block;
  box-sizing: border-box;
}
LapTimeList
This is a little more complex component. It takes one prop and that is the timeList array of our saved lap times. It than creates a array of LapTime components and renders them one by one.
To achieve that we use the map method of the array. We iterate through each time in our timeList array and create a new list item with a key prop and a LapTime child. For the lap prop of the LapTime we use our array index and add 1.
Key is also an important prop here. It helps React to easily differentiate between different components in an array.
It has to be unique. And since it is a simple array we can use the index from the map method as key.
To learn more about lists and keys in React you can find more reading material here.
// src/stopwatch/components/LapTimeList.js

import React, { Component, PropTypes } from 'react';
import './LapTimeList.css';

import LapTime from './LapTime';

class LapTimeList extends Component {

  static proptTypes = {
    timeList : PropTypes.array
  };

  static defaultProps = {
    timeList : []
  };

  render() {

    const { timeList } = this.props;

    return (
      <div className="LapTimeList">
        <div className="LapTimeList__listwrap">

          <div className="LapTimeList__headers">
            <span> Lap </span> <span> Time </span>
          </div>

          <ul className="LapTimeList__list" >
            {
              timeList.map( (time, index) => {
                return (
                  <li key={ index }>
                    <LapTime lap={ index + 1 } time={ time }  />
                  </li>
                )
              })
            }
          </ul>

        </div>
      </div>
    );
  }
}

export default LapTimeList;
// src/stopwatch/components/LapTimeList.css

.LapTimeList__list {
  list-style: none;
  padding: 0px;
  margin: 15px auto;
}

.LapTimeList__listwrap {
  max-width: 270px;
  margin: 0 auto;
}

.LapTimeList__headers {
  width: 100%;
}

.LapTimeList__headers span {
  width: 50%;
  font-weight: bold;
  text-align: center;
  display: inline-block;
  float: left;
}
Stopwatch
So its time to put it all together. This is our top component for the stopwatch module. It holds the state and defines all the methods that modify the state.
We create the default state in the constructor by setting:
isRunning = falseflag that tells us if the stopwatch is currently runningtime = 0is the current state of the timertimeList = []is the array that will hold our saved lap times
We define the default state in a separate function so we can easily reuse it to reset the state when needed.
We also need to create all the methods:
updateTimerincrements the timer by the provided amountstartsets theisRunningto true and creates the interval using the setInterval function. It updates our timer every 100 milliseconds as defined in ourConfig. We also save the reference of the interval to thethis.timerRefso we can use it later.stopsets theisRunningto false and clears the interval referenced in thethis.timerRefusing the clearInterval function.resetresets the state to defaultaddLapTimeadds current timer value to the array of saved times
In the render part we finally use our components and provide them with props from our state.
Most of it is pretty straight forward, but one thing to note is passing of the methods as props. We pass them as arrow functions. For example start = { () => this.start() }.
Reason for that is that React written with ES6 syntax does not auto bind this to methods. We could also use start = { this.start.bind(this) }.
// src/stopwatch/components/Stopwatch.js

import React, { Component } from 'react';
import './Stopwatch.css';

import Timer         from './Timer';
import Controls      from './Controls';
import LapTimeList   from './LapTimeList';

import Config        from '../constants/Config';

function getDefaultState() {
  return {
    isRunning : false,
    time      : 0,
    timeList  : []
  }
}

class Stopwatch extends Component {

  constructor( props ) {
    super(props);
    this.state    = getDefaultState();
    this.timerRef = null;
  }

  updateTimer(extraTime) {
    const { time } = this.state;
    this.setState({ time : time + extraTime });
  }

  start() {
    this.setState({
      isRunning : true
    }, () => {
      this.timerRef = setInterval(
        () => { this.updateTimer( Config.updateInterval ) }, Config.updateInterval
      )
    });
  }

  stop() {
    this.setState({
      isRunning : false
    }, () => {
      clearInterval(this.timerRef);
    });
  }

  reset() {
    this.setState(getDefaultState());
  }

  addLapTime() {
    const { time, timeList } = this.state;

    this.setState({
      timeList : [ ...timeList, time ]
    });
  }

  render() {

    const { isRunning, time, timeList } = this.state;

    return (
      <div className="Stopwatch">

        <h1>Simple Stopwatch App</h1>

        <Timer time={ time } />

        <Controls
          isRunning={ isRunning }
          start={ () => this.start() }
          stop={ () => this.stop() }
          reset={ () => this.reset() }
          addLapTime={ () => this.addLapTime() }
        />

        <LapTimeList timeList={ timeList } />
      </div>
    );
  }
}

export default Stopwatch;
// src/stopwatch/components/Stopwatch.css

.Stopwatch {
  text-align: center;
}
index file
And one last thing we need to complete our module is to create and index.js file. It will be the entry point for the module and contain all the exported components that we want to use in the other parts of the app.
So here we export our Stopwatch component.
// src/stopwatch/components/Stopwatch.js

export { default as Stopwatch } from './components/Stopwatch';
Using the module in App
Now that our Stopwatch module is finally done we can use it in our App component. We just import it and add it to the render method. I have also decided to leave the React logo for it to look a little nicer.
// src/App.js

import React, { Component } from 'react';
import logo from './logo.svg';
import './App.css';

import { Stopwatch } from './stopwatch';

class App extends Component {

  render() {
    return (
      <div className="App">
        <div className="App-header">
          <img src={logo} className="App-logo" alt="logo" />
        </div>
        <Stopwatch />
      </div>
    );
  }
}

export default App;
// src/App.css

.App {
  text-align: center;
}

.App-logo {
  animation: App-logo-spin infinite 20s linear;
  height: 80px;
}

.App-header {
  background-color: #222;
  height: 75px;
  padding: 20px;
  color: white;
}

.App-intro {
  font-size: large;
}

@keyframes App-logo-spin {
  from {
    transform: rotate(0deg);
  }

  to {
    transform: rotate(360deg);
  }
}
Final result
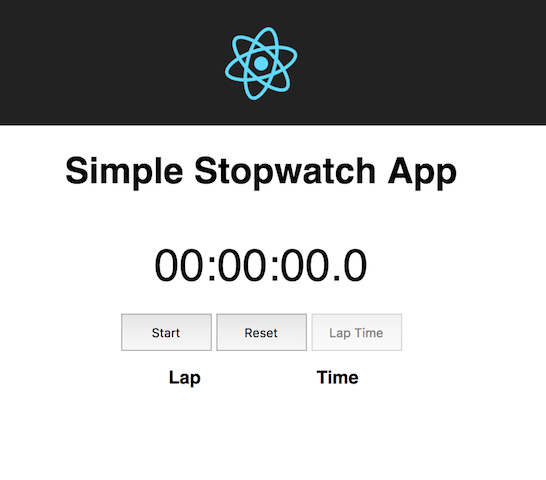
So our app is finally done. If everything was done correctly, there should be no errors in the console. And we should be able to see our app in its full glory.
This is our app when we first load it:

And this is after we start it and save the lap time two times:

Conclusion
And that is it. Congratulations, you have successfully reach the end of this tutorial. I hope it has been useful to you and that you have learned something new.
If you have any questions or remarks feel free to post them in the comments below.